RemotePC® Meeting is a video conferencing solution which allows business organizations to conduct online meetings over the Internet. People from various locations can attend these online meetings, share their content securely, and benefit from features like screen sharing, group messaging and whiteboard.
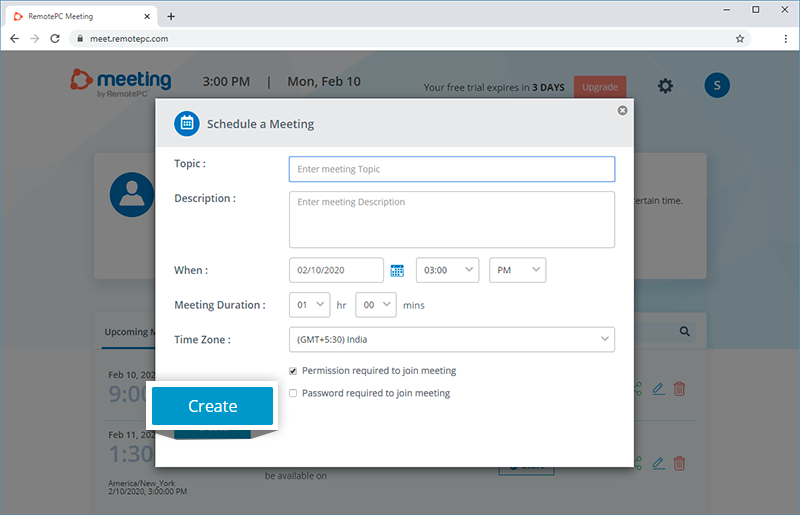
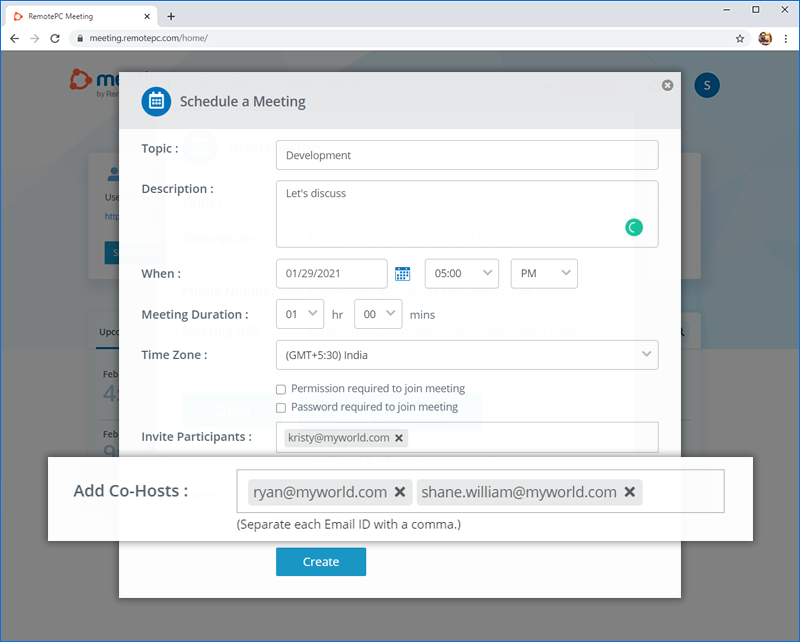
To schedule a meeting,
- Login to RemotePC Meeting via web browser.
- Click 'Schedule Meeting' in the 'Meeting' tab.
- In the 'Schedule Meetings' screen, enter the meeting title and description, and set a schedule for the meeting.
- Set pre-meeting security settings by selecting any of the following:
- Permission required to join meeting - Participants will require permission from the speaker before joining the meeting.
- Password required to join meeting - Use the random system generated password or enter a password, which participants will need to enter for joining a meeting.
- Enter email addresses of the intended participants to invite.
- Add co-hosts for managing the meeting.
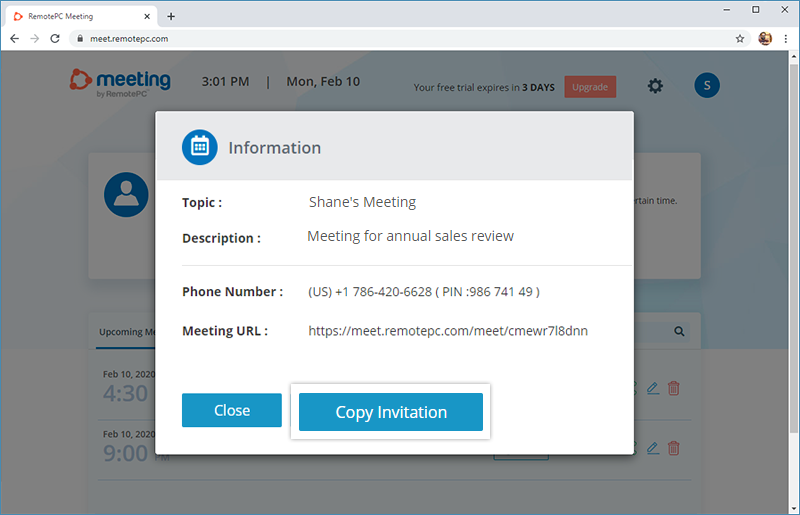
- Click 'Schedule Meeting'. The meeting information screen is displayed.
- Sync the scheduled meeting with your Google, Outlook or Yahoo calendar.
- Copy the meeting invitation to share with the intended participant.
A unique meeting link is created for your account when you sign up. You can use this link in the web console to start an online meeting anytime.
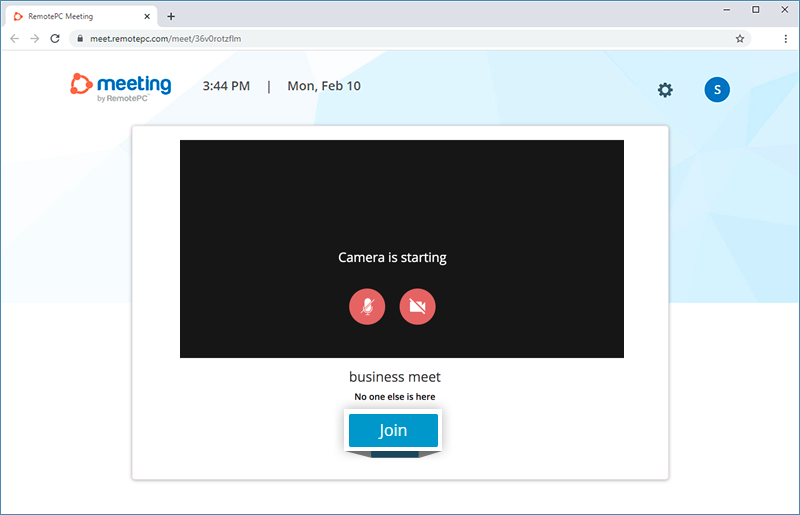
To start an online meeting,
- Login to RemotePC Meeting via web browser.
- Click 'Info' under your meeting section (example Shane's Meeting).
- Click 'Copy Invitation' to copy the meeting invite and share with intended participants.
- Click 'Start meeting' and allow RemotePC Meeting to access your camera and microphone, when prompted.
- Click 'Join' and wait for other participants to join.
Note: Participants may require permission to join your meeting or enter the meeting password, based on the meeting settings.
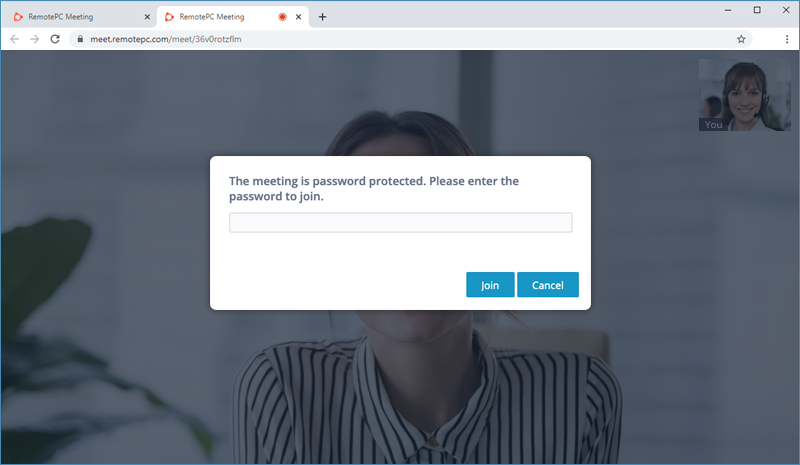
You require an invitation link from the presenter to join a meeting.
To join a meeting,
- At the scheduled time for the meeting, open the invitation link in a web browser.
- Allow RemotePC Meeting to access your camera and microphone, when prompted.
- Enter your name and the meeting password (if mentioned in the invitation).
- Click 'Join'.
Yes, you can add multiple co-hosts for a meeting. A co-host can start a meeting and allow the participants to join.
To add a co-host, while scheduling the meeting enter the email address of the members you wish to assign as co-host.
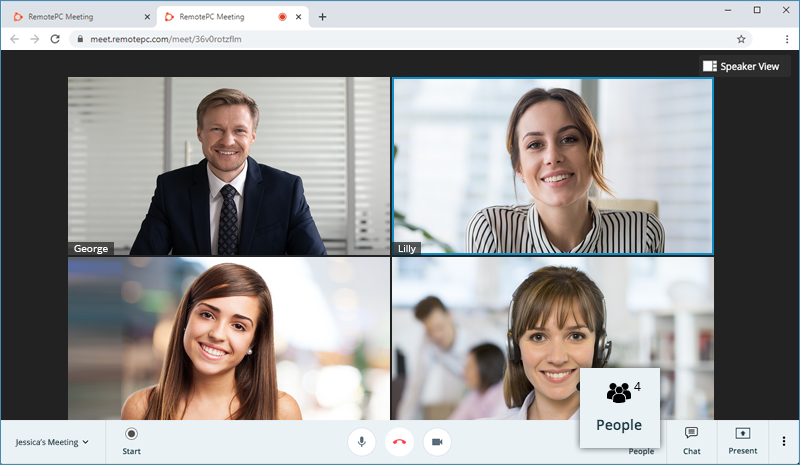
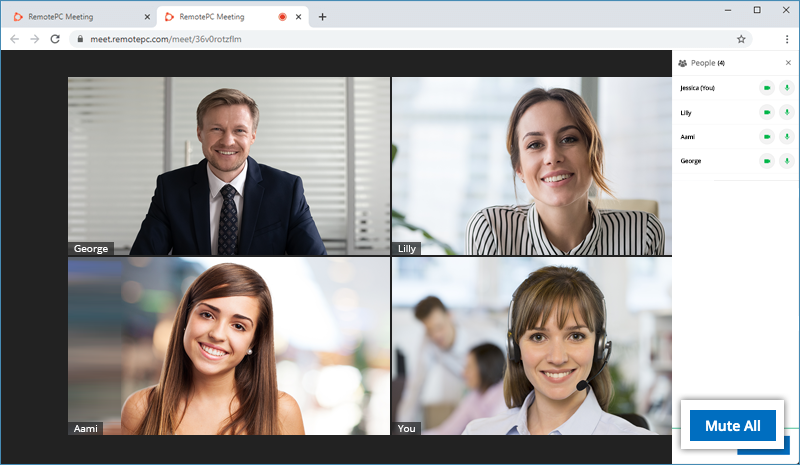
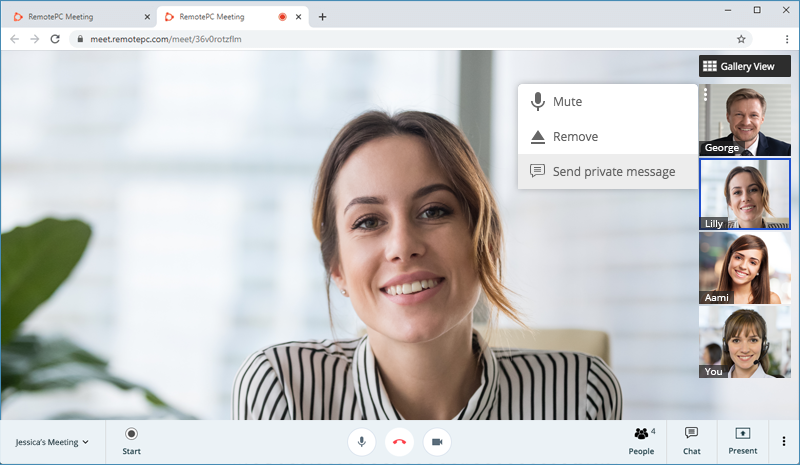
The 'People' tab displayed on clicking the ![]() lists all the participants of a meeting. The presenter of a meeting can remove participants at any point of time during the conference.
lists all the participants of a meeting. The presenter of a meeting can remove participants at any point of time during the conference.
A breakout room allows you to split a meeting into separate sessions. The moderator of the meeting can switch between rooms at any time and even move participants from the main meeting to a breakout room.
To add a breakout room,
- Klik op
 . The 'People' tab will appear.
 - Click 'Add breakout room'.
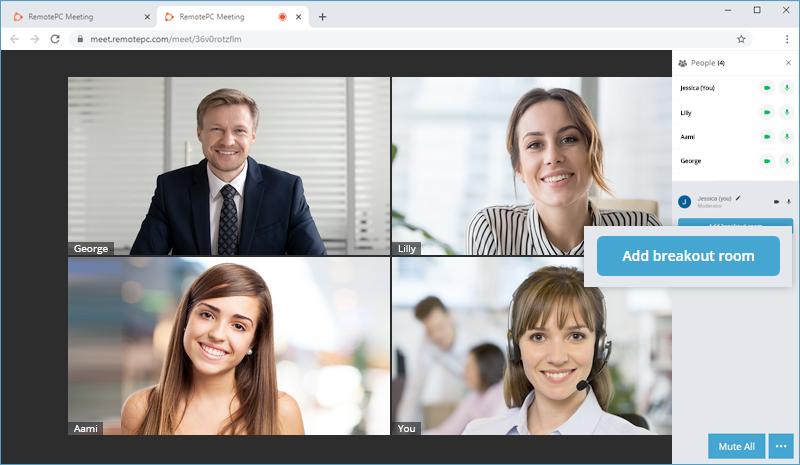
To add participants to a breakout room, click ![]() corresponding to a participant and select the required breakout room under 'Send participants to:'.
corresponding to a participant and select the required breakout room under 'Send participants to:'.

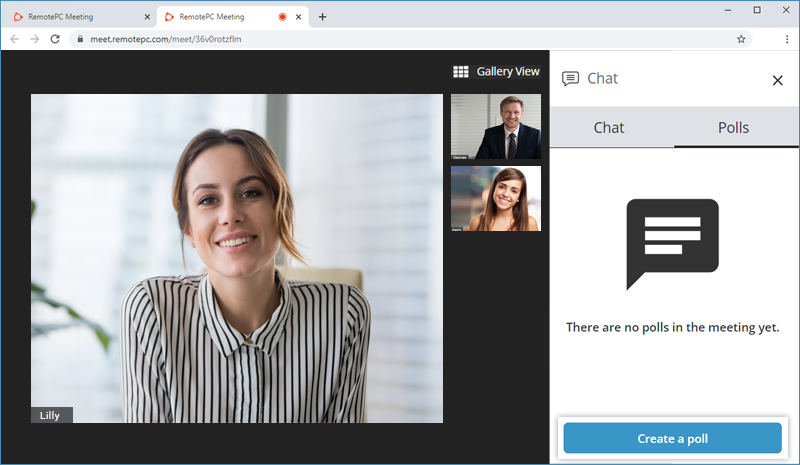
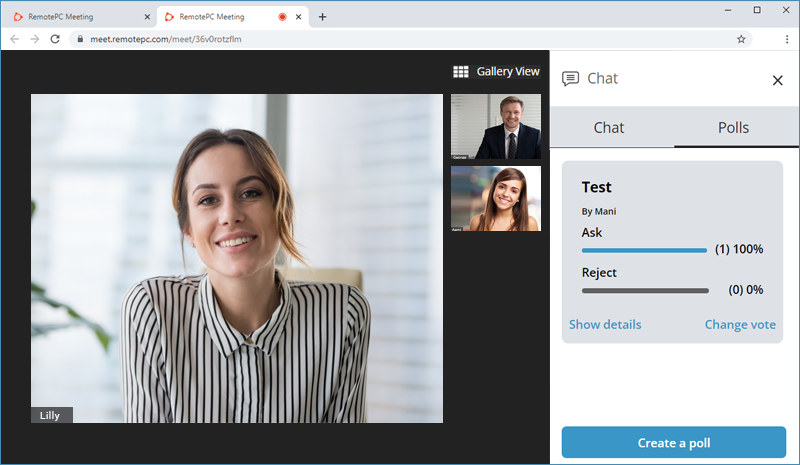
Yes, you can add a poll during the remote meeting and send it to your participants.
To add a poll and send to all the participants,
- Navigate to 'Chat' > 'Polls'.
- Click 'Create a poll'.
- Enter your question or statement under 'Poll Question'.
- Provide options for answers from which your participants can choose.
To enter additional options, click 'Add option'.
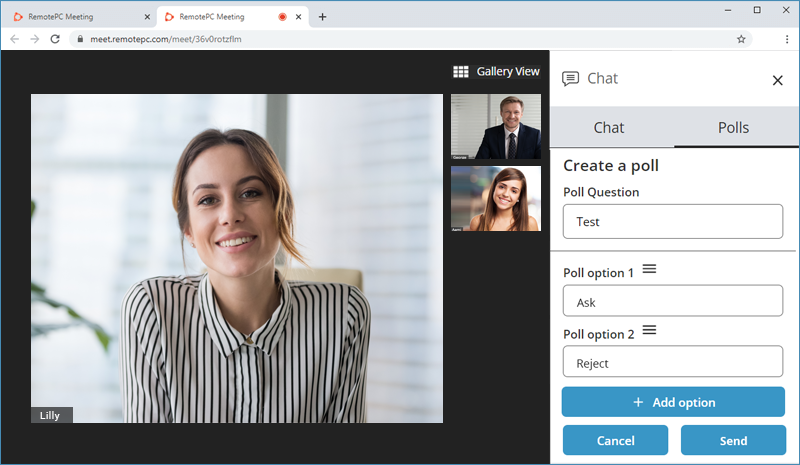
- Click 'Send'.
To answer a poll, participants can navigate to 'Chat' > 'Polls', select the required option, and click 'Submit'. They can also change their vote.
The presenter can mute or unmute all the participants of a meeting by clicking 'Mute All' or 'Unmute All' button in the 'People' panel.
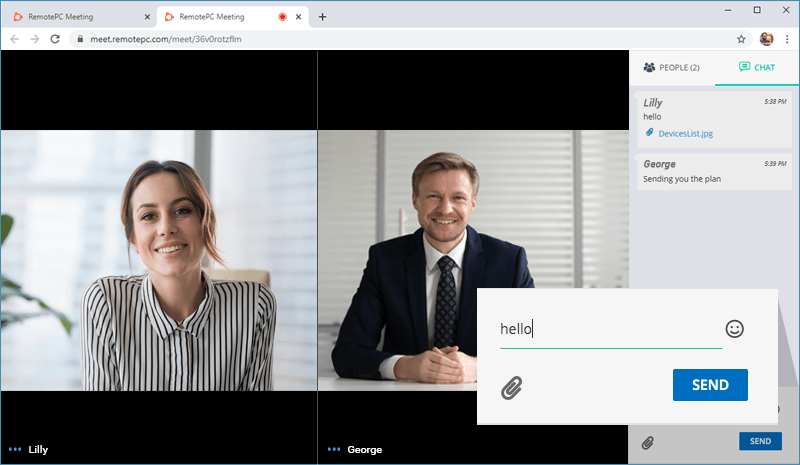
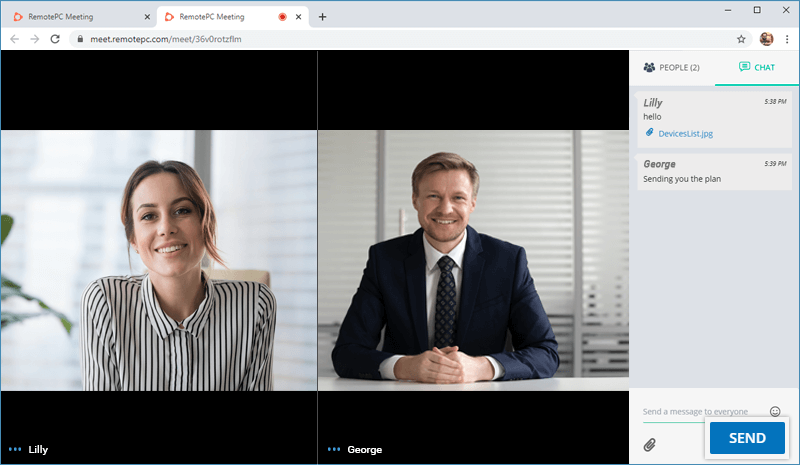
To send messages to all the participants,
- Go to the 'Chat' tab by clicking
 .
. - Type the message and click 'SEND'. Alternatively, press enter to send the message.
To send message to individual participant,
- In speaker view or gallery view, click
 corresponding to the participant whom you wish to send the message.
 - Click 'Send private message'.
- Type the message and click 'SEND'. Alternatively, press enter to send the message.
Yes, you can send attachments to the participant during a meeting.
To send a file,
- Go to the 'Chat' tab by clicking .
- Klik op
 . The file browser window will appear.
 - Select the file to send.
- Click 'SEND'.
To download any shared attachment, click on the attachment. Alternatively, you can right-click the attachment and save it.
Yes, you can record an online meeting and view the saved recordings for later reference or training sessions. The recordings are saved on the cloud.
To record a session,
- Klik op
 .
.
- Click 'Start' in the confirmation popup.
To stop recording,
- Klik op
 .
.
- Click 'Confirm' in the popup.
To view the recording,
- Click 'Recordings' on the dashboard.
- Klik op
 corresponding to a meeting, to play the recorded clip.
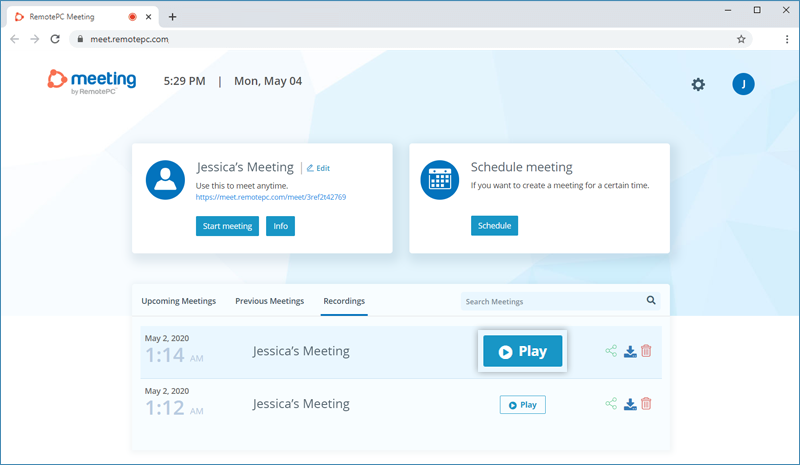
You can also share or download the recording by clicking  and
and  respectively.
You can choose to share your entire screen, an application window or a browser tab with the participants.
To share,
- Klik op
 to open the presentation tools menu.
 - Click 'Your Screen'.
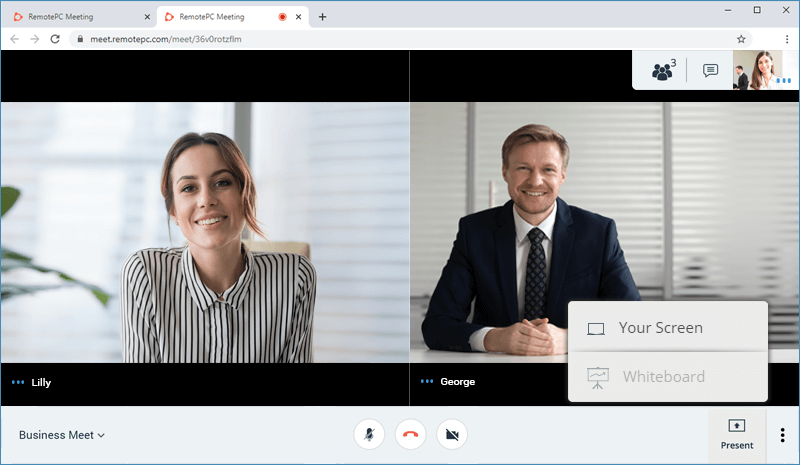
- In the 'Share your screen' popup, select any of the following options:
- Entire Screen - to share the entire screen. Select the 'Share audio' checkbox, if you wish to communicate while sharing your screen.
- Application Window - to share a particular application window.
- Web Browser Tab - to share a particular web browser tab.
- Click 'Share'.
All the participants will be able to view the shared screen.
To stop sharing, click 'Stop Presenting' on the meeting screen.
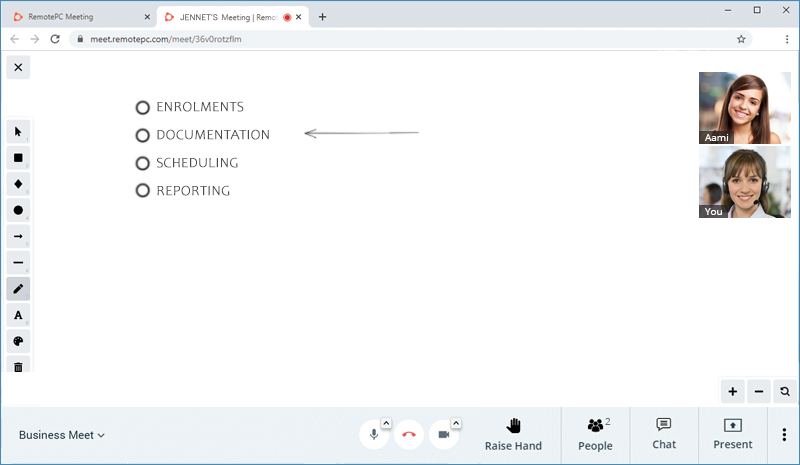
Attendees of a meeting can use the whiteboard tool to write or draw and collaborate.
To access whiteboard,
- Klik op to open the presentation tools menu.
- Klik op
 'Whiteboard' .

- Use the various tools on the LHS panel to draw or write.
To clear the whiteboard, click  and click 'Yes' in the confirmation window.
To copy any image on the clipboard, right-click and select the option to copy as PNG or SVG. You can also work with layers and rotate the image.
You can set the screen layout to speaker view or gallery view during an online meeting. By default the speaker view is displayed. To switch the view, click 'Gallery View' on the top-right corner.
To enter full screen mode, click  and select 'Full Screen'.
Yes, you can choose a preferred video quality for your online meetings.
To change video quality settings,
- Click and select 'Settings'.
- Set the desired video quality - Low bandwidth, Low definition, Standard definition, High definition.
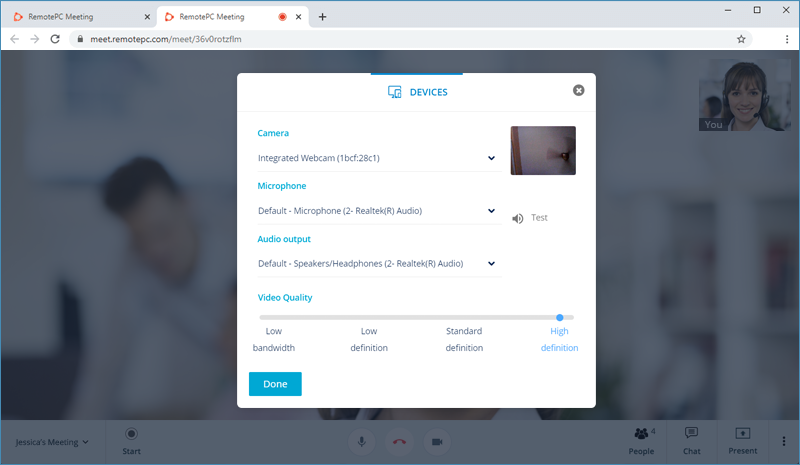
You can also modify your camera, microphone and audio output settings.
Yes, you can use an image as your background during a meeting. With virtual backgrounds, you can be meeting ready while working from home or any location.
To change your background,
- Klik op and select 'Change background'.
- Select a virtual background and click 'Apply'.
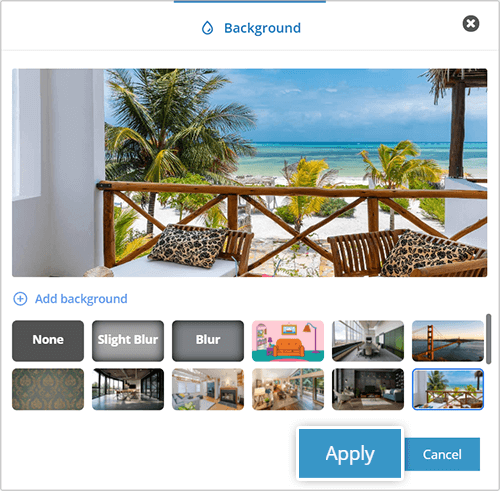
To create a blur effect during a meeting, click and select 'Slight Blur' or 'Blur'.
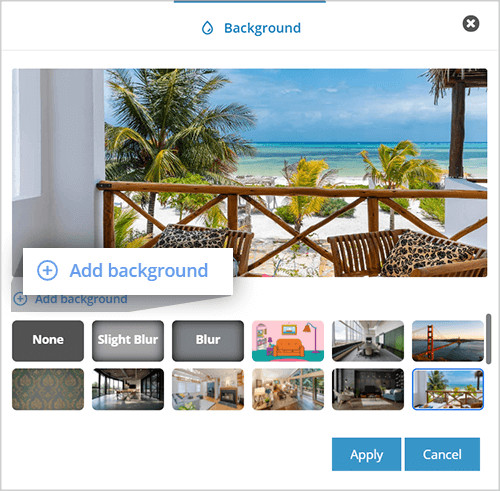
You can also add a custom background. To upload a custom background,
- Klik op and select 'Change background'.
- Click 'Add background'.
- Select the required image and click 'Open'.
To disable virtual background or blur effect,
- Klik op and select 'Change background'.
- Click 'None'.
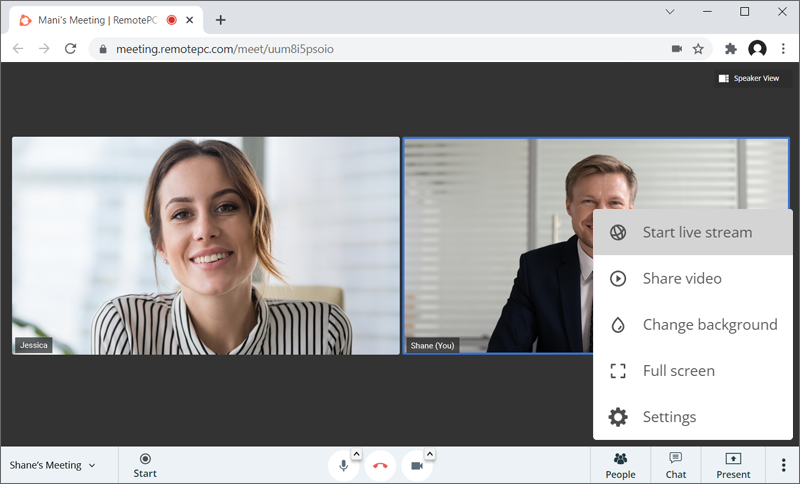
Yes, you can live stream RemotePC meeting on YouTube. To live stream, you need to verify your YouTube channel and must not have any live streaming restrictions in the past 90 days.
To start a live stream,
- Go to YouTube.
- From the top right, click 'CREATE'
 and select 'Go live'.

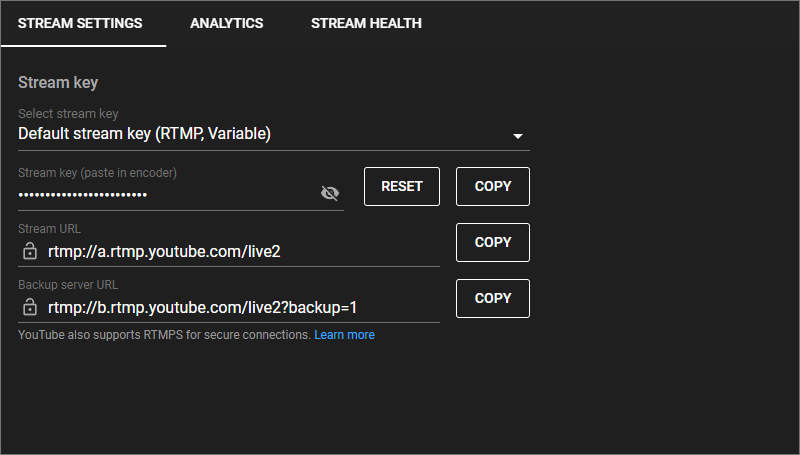
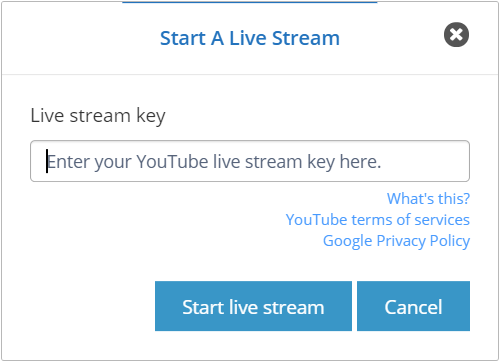
- In the 'STREAM SETTINGS' popup, you will find the 'Default stream key' that is required to live stream online meetings. Copy the 'Stream key'.
- Login to RemotePC Meeting via web browser and start the meeting.
- Klik op and select 'Start live stream'.
- Paste the YouTube stream key.
- Click 'Start live stream'. In a few seconds it will start live streaming.
Yes, you can connect your YouTube account to RemotePC Meeting for live streaming.
To start a live stream,
- Klik op and select 'Start live stream'.
- Enter the YouTube live stream key.
- Click 'Start live stream'.
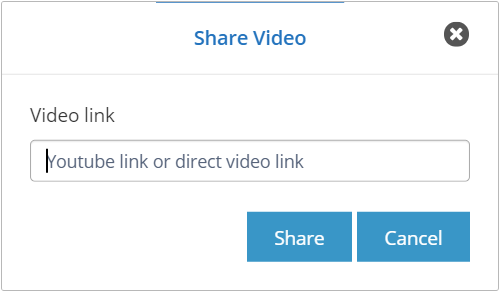
To share a video,
- Klik op and select 'Share video'.
- Enter the video link and click 'Share'.
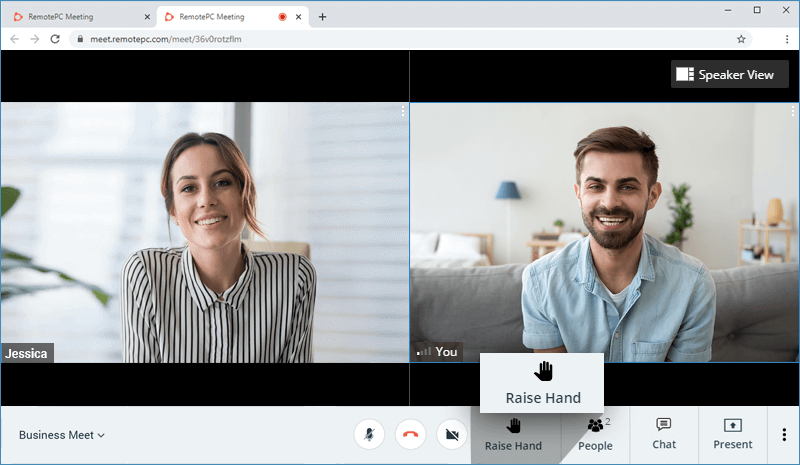
You can raise your hand during an online meeting to indicate that you need to communicate with the attendees or speaker.
To raise your hand, click 'Raise Hand' and to lower your hand click 'Down Hand'.
If you are using a G Suite account with RemotePC Meeting and wondering why every calendar event you create has Google Hangouts conference call details added, do not worry! By default, G Suite adds video calls to all Google Calendar events. G Suite Administrators can disable this setting by following the instructions outlined below.
To change the setting,
- Sign in to the Google Admin console.
- Click 'Apps' > 'G Suite' > 'Calendar'.
- Click 'Sharing settings'.
- Under 'Video Calls', uncheck 'Automatically add video calls to events created by a user'.
Yes, the RemotePC Meeting Scheduler Chrome Extension allows you to schedule meetings directly from your Google, Outlook, or Yahoo calendars. You can also start an instant meeting via the extension.
For scheduled meetings you can choose to send a meeting invite through both calendar notification or email. You can also make any calendar invite to a RemotePC Meeting.
To use the Meeting Chrome extension,
- Add the Meeting extension from the Chrome web store.
- Klik op
 on your browser and sign in to your RemotePC account.
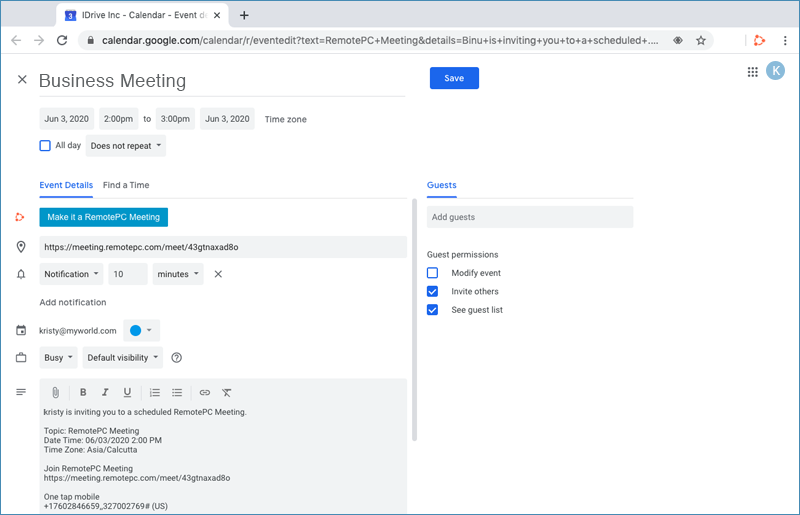
Note: For scheduling meetings, you must have a RemotePC account with Google, Yahoo, or Outlook.
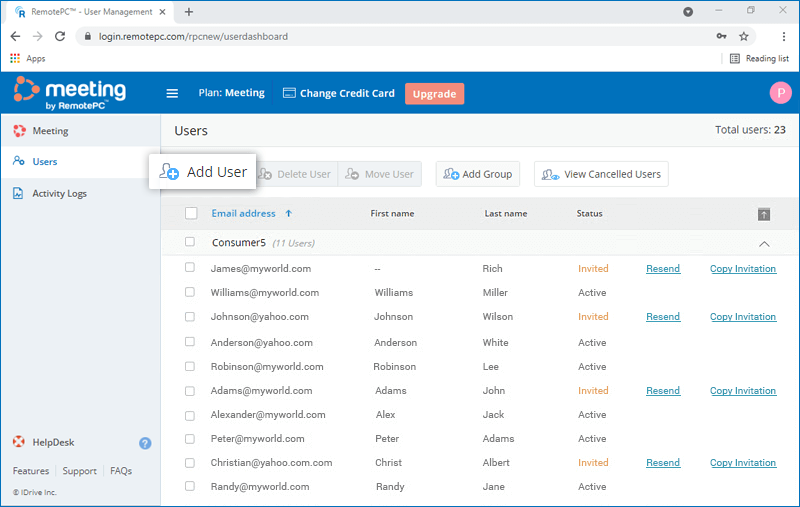
Yes, as an Admin, you can add hosts to your RemotePC Meeting account.
To add hosts,
- Login to your RemotePC Meeting account via web browser and click your username at the top-right of the screen.
- Select 'My Account' and navigate to the 'User Management' tab on the LHS.
- Click 'Add User' and enter the host's email address in the 'Email Address' field.
- Selecteer de groep in de vervolgkeuzelijst 'Groepsnaam' om gebruikers toe te voegen aan de betreffende groep.
- Select either the 'Enable trusted devices' or 'Enable two-factor authentication' checkbox, if you wish to enable trusted devices or two-factor authentication for the user.
- Klik op 'Gebruiker uitnodigen'.
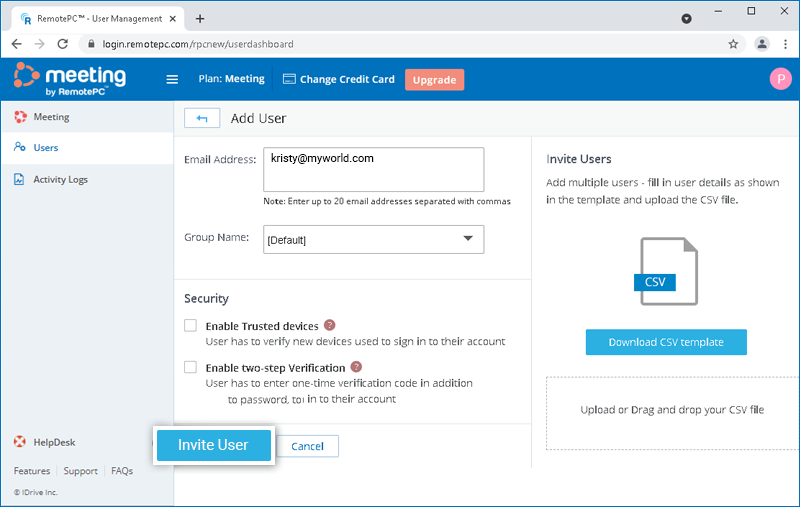
The invited host will get an email with the link to register to RemotePC Meeting. Once the host registers, their account will be added to your account. Each host can start instant meeting or schedule meetings from their account.
Yes, you can add multiple hosts to your RemotePC Meeting account at a time by uploading a CSV file.
To add multiple hosts,
- Login to your RemotePC Meeting account via web browser and click your username at the top-right of the screen.
- Select 'My Account' and navigate to the 'User Management' tab on the LHS.
- Click 'Add User', and click the 'Download CSV template'.
- Open the file, delete the sample entry, and add the information for your hosts in the following format (one line per user):
"EmailAddress,GroupName,2FA,SSO"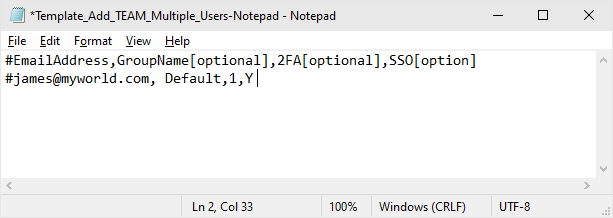
- Sla het gewijzigde bestand op.
- Sleep je opgeslagen CSV-bestand naar het gedeelte 'CSV-bestand uploaden of slepen'. Je kunt ook op het gebied klikken om naar je CSV-bestand te bladeren en het te uploaden.
- Klik in het pop-upvenster dat verschijnt op 'Gebruikers toevoegen'.
- A confirmation message appears after adding the hosts.
Note: You can add up to 500 users at a time using the CSV file.
The invited host will get an email with the link to register to RemotePC Meeting. Once the host registers, their account will be added to your account. Each host can start instant meeting or schedule meetings from their account.
Yes, as an Admin you can edit host permissions.
Bewerken,
- Login to your RemotePC Meeting account via web browser and click your username at the top-right of the screen.
- Select 'My Account' and navigate to the 'User Management' tab on the LHS.
- Ga met de muis over de gebruiker die je wilt bewerken en klik op
 .
.
- Make the required changes and click 'Save'.
To delete hosts,
- Login to your RemotePC Meeting account via web browser and click your username at the top-right of the screen.
- Select 'My Account' and navigate to the 'User Management' tab on the LHS.
- Om een enkele gebruiker te verwijderen, ga je met de muis over de gebruiker die je wilt verwijderen en klik je op
 .
.
- Om meerdere gebruikers uit de lijst te verwijderen, selecteert u de gebruikers en klikt u op 'Gebruiker verwijderen'.
- Klik op 'Ja' in het bevestigingsvenster.
A group is a collection of hosts organized together by the Admin. One host cannot be added to more than one group.
To create a host group,
- Login to your RemotePC Meeting account via web browser and click your username at the top-right of the screen.
- Select 'My Account' and navigate to the 'User Management' tab on the LHS.
- Klik op 'Groep toevoegen' in de menubalk.
- Voer een naam in het veld 'Groepsnaam' in.
- Klik op 'Toevoegen'.
Yes, you can move hosts between groups.
Verplaatsen,
- Login to your RemotePC Meeting account via web browser and click your username at the top-right of the screen.
- Select 'My Account' and navigate to the 'User Management' tab on the LHS.
- Selecteer de gebruiker(s) die je wilt verplaatsen en klik op 'Gebruiker verplaatsen'.
- Het venster 'Gebruiker verplaatsen' verschijnt. Selecteer de gewenste groep in de vervolgkeuzelijst 'Groepsnaam'.
- Klik op 'Verplaatsen'.
Een groep verwijderen,
- Login to your RemotePC Meeting account via web browser and click your username at the top-right of the screen.
- Select 'My Account' and navigate to the 'User Management' tab on the LHS.
- The list of groups and associated users appears. Hover on the group you want to delete and click
 .
. - Klik op 'Ok' in het bevestigingsvenster.
Een groep hernoemen,
- Login to your RemotePC Meeting account via web browser and click your username at the top-right of the screen.
- Select 'My Account' and navigate to the 'User Management' tab on the LHS.
- Ga met de muis over de groep die je wilt hernoemen en klik op .
- Enter the new name in the 'Group name' field and click 'Save'.
The two-factor authentication process enhances the security of your account and prevents access by unauthorized parties. Once two-factor authentication is enabled, in addition to your password, you will need to enter a verification code sent to your registered email address or phone number, while logging in to RemotePC Meeting .
Twee-factor authenticatie inschakelen,
- Login to your account via web browser and click your username at the top-right of the screen.
- Selecteer 'Mijn account' en navigeer naar het tabblad 'Beveiliging'.
- Klik in het gedeelte 'Authenticatie met twee factoren' op 'Inschakelen'.
- Select 'Email Address', 'Phone Number' or 'Time based OTP authentication' as your preferred method of receiving the one-time verification code and click 'Confirm'. If you have chosen 'Phone Number', enter the same and click 'Send Code'. Click here to know how to set up via Time-based OTP Authenticator app.
- Voer de verificatiecode in die naar je geregistreerde e-mailadres of telefoonnummer is gestuurd en klik op 'Verifiëren & inschakelen'.
Om in te loggen nadat authenticatie met twee factoren is ingeschakeld,
- Voer op het inlogscherm je gebruikersnaam en wachtwoord in en klik op 'Aanmelden'.
- Je wordt gevraagd een verificatiecode in te voeren die naar je e-mailadres of telefoonnummer wordt gestuurd.
- Voer de code in en klik op 'Verifiëren'.
How do I configure two-factor authentication for my RemotePC Meeting account with Time-based OTP authentication?
To configure two-factor authentication for your RemotePC Meeting account with the Time-based OTP authentication method, you will need to enter a verification code generated by the Time-based OTP authenticator app installed on your mobile device while signing in to RemotePC Meeting.
Follow the below steps to configure two-factor authentication with the Time-based OTP authenticator app:
- Login to RemotePC Meeting via web browser and click your username at the top-right of the screen.
- Selecteer 'Mijn account' en navigeer naar het tabblad 'Beveiliging'.
- Klik in het gedeelte 'Authenticatie met twee factoren' op 'Inschakelen'.
- Select 'Time based OTP authentication' as your preferred method of receiving the one-time verification code and click 'Confirm'. See supported TOTP apps.
- Install and launch the Time-based OTP authenticator app on your mobile device and scan the QR code displayed on your computer screen. Alternatively, you can also view the key by clicking on 'enter key manually' and type it manually on your mobile device and click 'Next'.
- Kopieer en sla de herstelcode die op je computerscherm wordt weergegeven veilig op of klik op 'Downloaden' om te downloaden en op te slaan als een .txt-bestand. Klik op 'Doorgaan'.
Note: You will require the recovery code to deactivate two-factor authentication for your account, in case you lose access to your mobile device where the Time-based OTP Authenticator app is installed.
- Voer de eenmalige code gegenereerd door de Time-based OTP Authenticator app in op uw mobiele apparaat en klik op 'Activeren'.
Om in te loggen nadat tweefactorauthenticatie is ingeschakeld met Time-based OTP Authenticator,
- Voer op het inlogscherm je gebruikersnaam en wachtwoord in en klik op 'Aanmelden'.
- U wordt gevraagd om de eenmalige code in te voeren die wordt gegenereerd door de Time-based OTP Authenticator app op uw mobiele apparaat.
- Voer de code in en klik op 'Code indienen'.
RemotePC Meeting supports the following Time-based OTP authenticator apps:
- Google Authenticator (Android/iPhone/BlackBerry)
- Duo Mobiel (Android/iPhone)
- Microsoft Authenticator (Android/iPhone/Windows Phone 7)
- Okta Verify (Android/iPhone)
- Any other authentication app that supports time-based one-time protocol, or compatible with Google Authenticator.
Can I disable two-factor authentication for my RemotePC Meeting account with Time based OTP authentication, in case I lost access to my mobile device?
Yes, you can disable two-factor authentication for your RemotePC Meeting account with Time based OTP authentication.
Uitschakelen,
- Navigate to the RemotePC Meeting login screen, enter your username and password, and click 'Login'.
- Klik in het scherm met de verificatiecode dat verschijnt op de link 'Ik krijg geen toegang tot mijn code'.
- In the 'Recovery Code' field, enter the recovery code received while configuring two-factor authentication for your RemotePC Meeting account.
- Click 'Deactivate'.
Trusted devices provide an additional level of security for your RemotePC Meeting account. Each time you login to your account from a new device, you are required to authorize it as a Trusted Device. You can thus prevent any unwanted access to your account.
Once you log in to your account via a new device for the first time, you will be prompted with the following message:
Er wordt een autorisatiemail voor het apparaat naar het geregistreerde e-mailadres gestuurd. Klik op de knop 'Toevoegen aan vertrouwde apparaten' in deze e-mail om het apparaat toe te voegen aan de lijst met vertrouwde apparaten. Er verschijnt een bevestigingsbericht met dezelfde informatie.
Je kunt de lijst met al je gekoppelde apparaten bekijken op het tabblad 'Beveiliging' van je sectie 'Mijn account'.
In de praktijk sluiten de beveiligingsfuncties verificatie op basis van twee factoren en vertrouwde apparaten elkaar uit. Daarom kun je op een bepaald moment ofwel tweefactorverificatie ofwel vertrouwde apparaten inschakelen, maar niet beide.
If you attempt to enable two-factor authentication while trusted device is enabled, a pop-up disclaimer will inform you that trusted devices will be automatically disabled and vice versa.
Yes, you can enable two-factor authentication or trusted devices for new and existing hosts.
- For new hosts: While adding a new host, you can select either the 'Enable trusted devices' or 'Enable two-factor authentication' checkbox in the 'Add host' screen.
- For existing hosts:
You can open the 'Edit host' screen by clicking displayed against an existing host, and then select the 'Enable trusted devices' or 'Enable two-factor authentication' checkbox.
- If two-factor authentication is enabled:
On login your hosts will be asked to choose a method (Email, SMS or Time-based OTP authentication) for receiving the one-time code. Once they verify the credentials via OTP, the configuration process will be complete.
During all subsequent logins, hosts will need to enter the code sent to their registered email address, phone number or the code displayed in their Time-based OTP authentication app. To change the method of receiving OTP, hosts can go to 'My Account' > 'Security' > 'two-factor authentication' and update the preferences from email address, phone number or Time-based OTP authentication.
- If trusted devices is enabled: Your hosts will be prompted to authorize every new device at login. They will need to click the 'Add to trusted devices' button in the device authorization mailer they receive.
Als je tijdens de verificatie met twee factoren de sms met de OTP niet kunt ontvangen, kun je ervoor kiezen om de verificatiecode via je e-mailadres te ontvangen. Klik op 'Verificatiecode ontvangen via e-mailadres' op de pagina voor verificatie met twee factoren. Er wordt een code naar het geregistreerde e-mailadres gestuurd, je kunt de code invoeren en het verificatieproces voltooien.